Go to the account settings page and log in to your Google account. Under Sign-in & security, click the “Signing in to Google” link.

In the Password & sign-in method section, click “2-Step Verification”.

An introductory screen displays telling us about 2-Step Verification. Click “Get Started” to continue.

Enter your password for your Google account and press Enter or click “Sign in”.

Google makes us set up phone-based verification, even though we’ll be using the app. The phone number we enter now will become our backup phone number later. You can receive the code via a text message or voice phone call. Click “Try It” to send a code to your phone.

If you have notifications set up for text messages on your phone, you’ll see a notification pop up with the verification code.

If you don’t have notifications enabled for text messages, you can go into your text messaging app and view the verification code there.

After receiving the verification code, enter it on the Confirm that it works screen and click “Next”.

You should see a screen telling you that it worked. Click “Turn On” to finish turning on 2-step verification.

So far, the Voice or text message is the default second step. We’ll change that in the next section.

Now, log out of your Google account and then log back in. You’ll be asked to enter your password…

…and then you will receive a text message with a 6-digit code just like before. Enter that code on the 2-Step Verification screen that displays.

Enabling Google Authenticator
Now that we’ve turned on 2-Step Verification and connected your phone to your Google account, we’ll set up Google Authenticator. On the 2-Step Verification page in your browser, click “Setup” under Authenticator app.

On the dialog box that displays, select the type of phone you have and click “Next”.

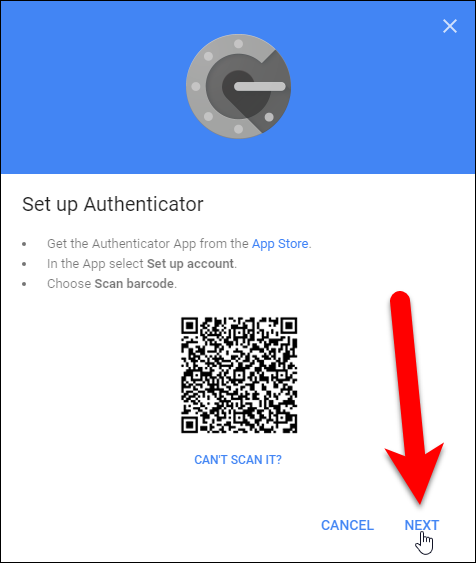
The “Set up Authenticator” screen displays with a QR code, or bar code. We need to scan this with the Google Authenticator app…

…so, now install the Google Authenticator app on your phone and then open the app.

On the main Authenticator screen, tap the plus sign at the top.

Then, tap “Scan barcode” on the popup at the bottom of the screen.

You camera is activated and you’ll see a green box. Aim that green box at the QR code on your computer screen. The QR code is automatically read.

You’ll see your newly added Google account in the Authenticator app. Note the code for the account you just added.

After adding the account to Google Authenticator, you’ll have to type in the generated code. If the code is about to expire, wait for it to change so you have enough time to type it.
Now, go back to your computer and click “Next” on the Set up Authenticator dialog box.
Enter the code from the Authenticator app on the Set up Authenticator dialog box and click “Verify”.

The Done dialog box displays. Click “Done” to close it.

The Authenticator app is added to the list of second verification steps and becomes the default.

The phone number you entered earlier becomes your backup phone number. You can use this number to receive an authentication code if you ever lose access to the Google Authenticator app or reformat your device.
Logging In
The next time you sign in, you’ll have to provide the current code from your Google Authenticator app, in the same way you provided the code you received in a text message earlier in this article.
